TM 9-2320-365-20-3
7-40. OIL PRESSURE SWITCH REPLACEMENT
This task covers:
a. Removal
b. Installation
c. Follow-On Maintenance
INITIAL SETUP
Equipment Conditions
Cab raised (TM 9-2320-365-10).
Batteries disconnected (para 7-48).
Tools and Special Tools
Tool Kit, Genl Mech (Item 44, Appendix C)
Materials/Parts
Antiseize Compound (Item 63, Appendix D)
a. Removal.
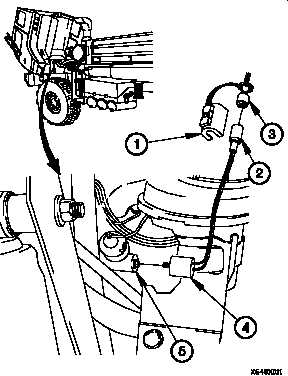
(1) Disconnect connector clamp (1) from connector J34 (2).
(2) Disconnect connector P34 (3) from connector J34 (2).
(3) Remove oil pressure switch (4) from fitting (5).
b. Installation.
WARNING
Adhesives, solvents, and sealing com-
pounds can burn easily, can give off
harmful vapors, and are harmful to skin
and clothing. Keep away from open fire
and use in a well-ventilated area. If
adhesive, solvent, or sealing compound
gets
on
skin
or
clothing,
wash
immediately with soap and water. Failure
to comply may result in injury to
personnel.
(1) Apply antiseize compound to threads of oil pressure
switch (4).
(2) Install oil pressure switch (4) in fitting (5).
(3) Connect connector P34 (3) to connector J34 (2).
(4) Connect connector clamp (1) on connector J34 (2).
7-172
Change 1


