TM 9-2320-365-20-5
23-6. AIR DRYER REPLACEMENT/REPAIR
This task covers:
a. Removal
b. Disassembly
c. Assembly
d. Installation
e. Follow-On Maintenance
INITIAL SETUP
Equipment Conditions
Air tanks drained (TM 9-2320-365-10).
Batteries disconnected (para 7-48).
Tools and Special Tools
Goggles, Industrial (Item 15, Appendix C)
Tool Kit, Genl Mech (Item 44, Appendix C)
Wrench, Torque, 0-175 lb-ft (Item 57, Appendix C)
Wrench, Torque, 0-200 lb-in. (Item 58, Appendix C)
Wrench Set, Socket (Item 48, Appendix C)
Purge Valve Tool (Item E-22, Appendix E)
Hammer, Hand (Item 18, Appendix C)
Materials/Parts
Nut, Plain, Hex (Item 36, Appendix D)
Ties, Cable, Plastic (Item 76, Appendix D)
Parts Kit, Dehydrator (Item 196, Appendix G)
Nut, Self-Locking (4) (Item 149, Appendix G)
Boot Kit, Exhaust (Item 3, Appendix G)
Dispenser, Pressure Sensitive Adhesive Tape
(Item 21, Appendix D)
Personnel Required
(2)
a. Removal.
WARNING
• Air dryer may contain air pressure. Loosen
input air hose connector slowly to vent off
air pressure. Failure to comply may cause
injury to personnel.
• Wear appropriate eye protection when
working under vehicle due to the possibility
of falling debris.
Failure to comply may
result in injury to personnel.
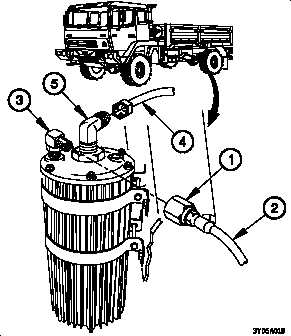
(1) Loosen input air hose nut (1).
(2) Disconnect input air hose (2) from 90-degree fitting (3).
(3) Disconnect outlet air hose (4) from 90-degree fitting (5).
Change 1
23-15


