TM 9-2320-365-20-4
16-29. M1079 RUBBER BUMPER AND TEE LATCH REPLACEMENT
This task covers:
a. Rubber Bumper Removal
b. Rubber Bumper Installation
c. Tee Latch Removal
d. Tee Latch Installation
INITIAL SETUP
Equipment Conditions
Engine shut down (TM 9-2320-365-10).
Tools and Special Tools
Tool Kit, Genl Mech (Item 44, Appendix C)
Materials/Parts
Lockwasher (Item 81, Appendix G)
Lockwasher (4) (Item 77, Appendix G)
Sealing Compound (Item 67, Appendix D)
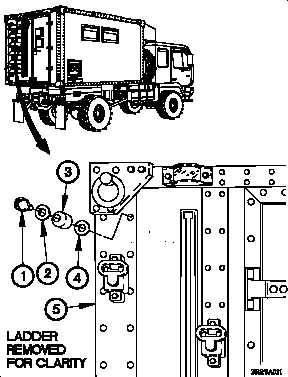
a. Rubber Bumper Removal.
NOTE
Left and right side rubber bumpers are
removed the same way. Left side shown.
(1) Remove screw (1), lockwasher (2), rubber bumper (3),
and spacer (4) from van body (5). Discard lock-washer.
(2) Remove sealing compound from van body (5).
b. Rubber Bumper Installation.
WARNING
Adhesives, solvents, and sealing com-
pounds can burn easily, can give off
harmful vapors, and are harmful to skin
and clothing. Keep away from open fire
and use in a well-ventilated area.
If
adhesive, solvent, or sealing compound
gets
on
skin
or
clothing,
wash
immediately with soap and water. Failure
to comply may result in injury to
personnel.
(1) Apply sealing compound to van body (5).
(2) Install spacer (4) and rubber bumper (3) on van body (5)
with lockwasher (2) and screw (1).
16-171


